本文主要记录了个人在学习NIO相关知识时一些思考过程,主要用于备忘,错误难免,敬请指出!
前言
Java NIO API中包含三个核心组件:Channels、 Buffers、 Selector,其余组件有些只不过是为了这三个组件能更好的结合使用而设计的一些工具类,本文主要记录对于Channel和Buffer相关知识的学习。
Buffer
Buffer是什么、怎么用?
buffer本质上来讲就是一块能进行数据读写的内存区域,Java NIO Buffer对象对这块内存进行了封装,提供了一系列方法使得操纵这块内存更加方便。对Java NIO Channel的读写操作都要通过Buffer对象来进行,Java中Buffer类 UML图如下:

我认为对于Buffer可以从两个角度来进行分类,一是针对其操作的数据类型不同将其分为ByteBuffer、CharBuffer、ShortBuffer、IntBuffer、LongBuffer、Floatbuffer、DoubleBuffer七种;二是针对其指向的实际存储空间是处于堆内还是堆外可分为HeapBuffer与DirectByteBuffer。
要想使用DirectBuffer,可以通过ByteBuffer.allocateDirect方法来分配或者通过内存映射文件方式创建,更多关于DirectBuffer使用的问题,可参考我的另一篇博客:Java中的强-软-弱-虚引用
下面是一个使用ByteBuffer的简单示例:
RandomAccessFile aFile = new RandomAccessFile("data/nio-data.txt", "rw");
FileChannel inChannel = aFile.getChannel();

//create buffer with capacity of 48 bytes
ByteBuffer buf = ByteBuffer.allocate(48);

//第一步:向buffer中写数据,buf此时处于写模式,从channel中向buffer中写数据
int bytesRead = inChannel.read(buf); //read into buffer.
while (bytesRead != -1) {
  //第二步:调用buffer.flip()方法
  buf.flip();  //make buffer ready for read

  while(buf.hasRemaining()){
      //第三步:从buffer中将数据取出
      System.out.print((char) buf.get()); // read 1 byte at a time
  }
  //第四步:调用buffer.clear()或者buffer.compact方法准备再次向buffer中写入数据
  buf.clear(); //make buffer ready for writing
  bytesRead = inChannel.read(buf);
}
aFile.close();
使用Buffer读写可简单归纳为以下四个步骤:
- 向buffer中写数据
- 调用buffer.flip()方法
- 从buffer中将数据读出
- 调用buffer.clear()或者buffer.compact方法准备再次向buffer中写入数据
为什么Buffer需要这么用?
为什么使用ByteBuffer会有这样的套路呢?这就需要看一下ByteBuffer的数据结构:
public abstract class Buffer {

    private int mark = -1;
    private int position = 0;
    private int limit;
    private int capacity;

    public final Buffer flip() {
        limit = position;
        position = 0;
        mark = -1;
        return this;
    }

    public final Buffer clear() {
        position = 0;
        limit = capacity;
        mark = -1;
        return this;
    }

	...
}
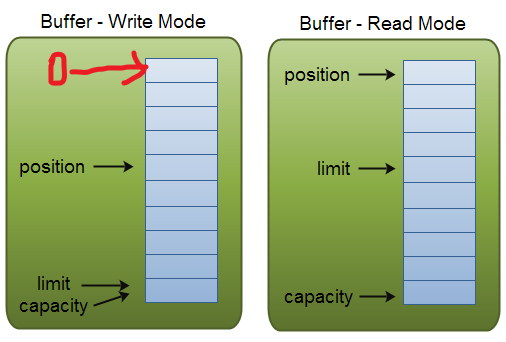
Buffer可以处于两种模式,即读模式和写模式,这两种模式的区分主要是通过position和limit这两个成员变量来实现的,其具体示意图如下:

Buffer对象初始创建时处于写模式,position为0,limit和capacity相同均为buffer的最大容量,之后每向ByteBuffer中写入一个字节,position就相应加1,position最大为capacity-1,写入数据结束后,position就代表写入的字节数。
之后调用flip()方法将ByteBuffer从写模式切换到读模式,具体操作为将limit值变为position值,position置0,从0到limit中包含的字节即为待读取的字节。读取数据结束后调用clear方法将ByteBuffer重新切换到写模式。
ByteBuffer的一系列API功能的实现几乎都是针对这几个成员变量进行了不同的操作。
Buffer及其子类并不是线程安全的,当有多个线程并发操作同一个Buffer对象时,需要使用适当的同步机制。
Channel
Java NIO中Channel的一种分类方式是通过判断其是否是SelectableChannel的子类,只有SelectableChannel的子类才可以进行select操作,可以进行Select操作的Channel典型代表有DatagramChannel、SocketChannel和ServerSocketChannel,不能进行Select操作的Channel的典型代表是FileChannel,FileChannel相比于传统的IO流操作文件相比,将操作形式变为了Channel-Buffer方式并增加了几种更为高效的文件操作方式,具体使用可以参考:Java-NIO相关问题记录
问题:为什么FileChannel不支持配置非阻塞模式呢?
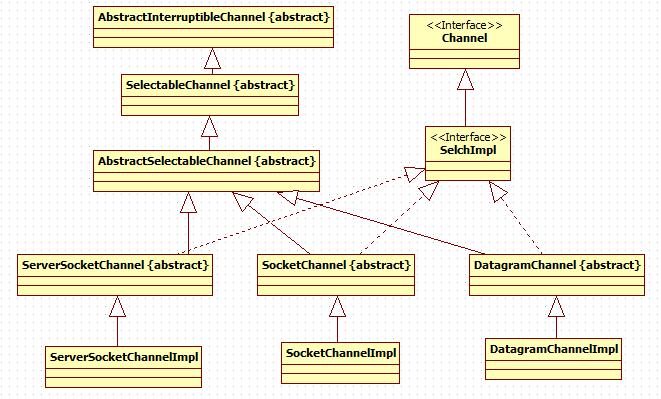
接下来主要介绍SelectableChannel的几个子类DatagramChannel、SocketChannel、ServerSocketChannel的使用,其UML图如下:

DatagramChannel、SocketChannel、ServerSocketChannel都可以配置在阻塞或者非阻塞模式下运行,在阻塞模式下运行时其运行机制与使用DatagramSocket、Socket、ServerSocket几乎是相同的,只不过将套路换为了channel-buffer而已,阻塞模式使用简单示例如下:
public class ServerChannel {

    private static final String SERVERIP = "localhost";
    private static final int PORT = 8000;

    public static void main(String[] args) throws IOException {
        ServerSocketChannel serverSocketChannel = ServerSocketChannel.open();
        serverSocketChannel.configureBlocking(true);
        serverSocketChannel.bind(new InetSocketAddress(SERVERIP, PORT));
        while (true) {
            SocketChannel socketChannel = serverSocketChannel.accept();
            System.out.println("接受到新的客户端");
            new Thread(new SocketChannelThread(socketChannel)).start();
        }
    }

    private static class SocketChannelThread implements Runnable {

        private SocketChannel socketChannel;

        public SocketChannelThread(SocketChannel socketChannel) {
            this.socketChannel = socketChannel;
        }

        @Override
        public void run() {
            if (socketChannel == null) return;
            ByteBuffer src = ByteBuffer.allocate(1024);
            src.put("hahaha".getBytes());
            src.flip();
            try {
                socketChannel.write(src);
            } catch (IOException e) {
                e.printStackTrace();
            } finally {
                try {
                    socketChannel.close();
                } catch (IOException e) {
                    e.printStackTrace();
                }
            }
        }
    }
}

public class ClientChannel {

    private static final String SERVERIP = "localhost";
    private static final int PORT = 8000;

    public static void main(String[] args) throws IOException {
        SocketChannel socketChannel = SocketChannel.open();
        socketChannel.configureBlocking(true);
        socketChannel.connect(new InetSocketAddress(SERVERIP, PORT));
        ByteBuffer src = ByteBuffer.allocate(1024);
        socketChannel.read(src);
        src.flip();
        byte[] dst = new byte[1024];
        src.get(dst, 0, src.limit());
        System.out.println(new String(dst));
    }
}
仅仅在阻塞模式下使用SelectableChannel意义自然是不大的,因为引入SelectableChannel的目的就是为了实现多路复用,那么应该如何使用这些Channel才能使用多路复用呢?为什么这些SelectableChannel配合Selector在配置为非阻塞模式下就可以实现多路复用呢?相比于阻塞网络I/O,NIO到底消除了哪些部分的阻塞操作呢?接下来分别对SocketChannel、ServerSocketChannel、DatagramChannel进行分析。
SocketChannel
open及connect操作
对于SocketChannel对象的创建,不能直接使用new,而需要使用SocketChannel的静态方法open来创建,通过open方法创建的意义在于可以自行提供SocketChannel的实现,若不提供,则使用默认的SelectorProvider创建,实际上就是创建了一个SocketChannelImpl类对象而已。
public abstract class SocketChannel extends AbstractSelectableChannel
    implements ByteChannel, ScatteringByteChannel, GatheringByteChannel, NetworkChannel
{
    public static SocketChannel open() throws IOException {
        return SelectorProvider.provider().openSocketChannel();
    }

	...
}

public abstract class SelectorProvider {
    public static SelectorProvider provider() {
        synchronized (lock) {
            if (provider != null)
                return provider;
            return AccessController.doPrivileged(
                new PrivilegedAction<SelectorProvider>() {
                    public SelectorProvider run() {
                            if (loadProviderFromProperty())
                                return provider;
                            if (loadProviderAsService())
                                return provider;
                            provider = sun.nio.ch.DefaultSelectorProvider.create();
                            return provider;
                        }
                    });
        }
    }
}

public abstract class SelectorProviderImpl extends SelectorProvider {
	public SocketChannel openSocketChannel() throws IOException {
		//SocketChannel的实现类
        return new SocketChannelImpl(this);
    }
}
对于connect操作,SocketChannel共给我们提供了4个相关方法,当配置SocketChannel工作在阻塞模式下时,一般只需调用connect方法就可以:
//SocketChannel默认工作在阻塞模式下
socketChannel.connect(new InetSocketAddress(InetAddress.getByName(REMOTE_HOST), PORT));
需要注意的是,相比于直接使用socket,socketChannel在阻塞模式下connect并不能直接指定超时时间,一直会阻塞到连接建立或者抛出异常,若想指定超时时间,可以通过socketChannel.socket()方法获得socketChannel对应的socket,再使用此socket的connect方法,当然这样做一般没有必要。
若调用connect方法之前,SocketChannel工作在非阻塞模式下,connect方法在调用之后不管连接是否建立都会立即返回,除非建立的是本地连接,非阻塞模式下第一次调用connect方法返回之后连接一般都不会建立完成,之后我们就可以调用finishConnect()判断连接是否建立完成,一般使用套路是这样:
socketChannel.configureBlocking(false);
socketChannel.connect(new InetSocketAddress("http://jenkov.com", 80));
//非阻塞模式下,在连接建立之前,connect方法只能被调用一次
while(! socketChannel.finishConnect() ) {
//wait, or do something else...
}
如果不想频繁的使用finishConnect方法测试连接是否建立完成,还想使用SocketChannel的非阻塞模式,我们还可以这样:
socketChannel.connect(new InetSocketAddress(InetAddress.getByName(SERVERIP), PORT));
//在连接建立之后再切换到非阻塞模式
socketChannel.configureBlocking(false);
connect与finishConnect方法源码简单分析如下:
class SocketChannelImpl extends SocketChannel implements SelChImpl {'

    void ensureOpenAndUnconnected() throws IOException { // package-private
        synchronized (stateLock) {
            if (!isOpen())
                throw new ClosedChannelException();
            if (state == ST_CONNECTED)
                throw new AlreadyConnectedException();
            if (state == ST_PENDING)
                throw new ConnectionPendingException();
        }
    }

    public boolean connect(SocketAddress sa) throws IOException {
        int localPort = 0;
        //connect操作需要获得当前channel的读锁、写锁、阻塞锁,这意味这在connect方法执行的过程中对当前channel进行的读写操作、
        //测试是否阻塞等操作会阻塞直到connect方法执行完毕
        synchronized (readLock) {
            synchronized (writeLock) {
                //保证当前channel在建立连接时是打开的,并且现在不处于等待建立连接或者连接已经建立的状态
                ensureOpenAndUnconnected();
                InetSocketAddress isa = Net.checkAddress(sa);
                SecurityManager sm = System.getSecurityManager();
                if (sm != null)
                    sm.checkConnect(isa.getAddress().getHostAddress(), isa.getPort());
                synchronized (blockingLock()) {
                    int n = 0;
                    try {
                        try {
                            begin();
                            synchronized (stateLock) {
                                if (!isOpen()) {
                                    return false;
                                }
                                // notify hook only if unbound
                                if (localAddress == null) {
                                    NetHooks.beforeTcpConnect(fd,
                                                           isa.getAddress(),
                                                           isa.getPort());
                                }
                                readerThread = NativeThread.current();
                            }
                            for (;;) {
                                InetAddress ia = isa.getAddress();
                                if (ia.isAnyLocalAddress())
                                    ia = InetAddress.getLocalHost();
                                //实际建立连接的方法,fd中包含了当前channel是阻塞还是非阻塞等信息
                                n = Net.connect(fd,
                                                ia,
                                                isa.getPort());
                                if (  (n == IOStatus.INTERRUPTED)
                                      && isOpen())
                                    continue;
                                break;
                            }
                        } finally {
                            readerCleanup();
                            end((n > 0) || (n == IOStatus.UNAVAILABLE));
                            assert IOStatus.check(n);
                        }
                    } catch (IOException x) {
                        // If an exception was thrown, close the channel after
                        // invoking end() so as to avoid bogus
                        // AsynchronousCloseExceptions
                        close();
                        throw x;
                    }
                    synchronized (stateLock) {
                        remoteAddress = isa;
                        if (n > 0) {

                            // Connection succeeded; disallow further
                            // invocation
                            state = ST_CONNECTED;
                            if (isOpen())
                                localAddress = Net.localAddress(fd);
                            return true;
                        }
                        // If nonblocking and no exception then connection
                        // pending; disallow another invocation
                        if (!isBlocking())
                            state = ST_PENDING;
                        else
                            assert false;
                    }
                }
                return false;
            }
        }
    }

    public boolean finishConnect() throws IOException {
        //与connect方法类似,执行时候也需要获得读锁、写锁、状态锁、阻塞锁等
        synchronized (readLock) {
            synchronized (writeLock) {
                synchronized (stateLock) {
                    if (!isOpen())
                        throw new ClosedChannelException();
                    if (state == ST_CONNECTED)
                        return true;
                    if (state != ST_PENDING)
                        throw new NoConnectionPendingException();
                }
                int n = 0;
                try {
                    try {
                        begin();
                        synchronized (blockingLock()) {
                            synchronized (stateLock) {
                                if (!isOpen()) {
                                    return false;
                                }
                                readerThread = NativeThread.current();
                            }
                            //如果调用finishConnect方法时是非阻塞的
                            if (!isBlocking()) {
                                for (;;) {
                                    n = checkConnect(fd, false,
                                                     readyToConnect);
                                    if (  (n == IOStatus.INTERRUPTED)
                                          && isOpen())
                                        continue;
                                    break;
                                }
                            } else {//调用finishConnect方法时是阻塞的
                                for (;;) {
                                    n = checkConnect(fd, true,
                                                     readyToConnect);
                                    if (n == 0) {
                                        // Loop in case of
                                        // spurious notifications
                                        continue;
                                    }
                                    if (  (n == IOStatus.INTERRUPTED)
                                          && isOpen())
                                        continue;
                                    break;
                                }
                            }
                        }
                    } finally {
                        synchronized (stateLock) {
                            readerThread = 0;
                            if (state == ST_KILLPENDING) {
                                kill();
                                // poll()/getsockopt() does not report
                                // error (throws exception, with n = 0)
                                // on Linux platform after dup2 and
                                // signal-wakeup. Force n to 0 so the
                                // end() can throw appropriate exception
                                n = 0;
                            }
                        }
                        end((n > 0) || (n == IOStatus.UNAVAILABLE));
                        assert IOStatus.check(n);
                    }
                } catch (IOException x) {
                    // If an exception was thrown, close the channel after
                    // invoking end() so as to avoid bogus
                    // AsynchronousCloseExceptions
                    close();
                    throw x;
                }
                if (n > 0) {
                    synchronized (stateLock) {
                        state = ST_CONNECTED;
                        if (isOpen())
                            localAddress = Net.localAddress(fd);
                    }
                    return true;
                }
                return false;
            }
        }
    }

    //判断连接是不是处于已经建立状态
    public boolean isConnected() {
        synchronized (stateLock) {
            return (state == ST_CONNECTED);
        }
    }

    //判断连接是不是处于正在建立的状态
    public boolean isConnectionPending() {
        synchronized (stateLock) {
            return (state == ST_PENDING);
        }
    }
}
要想使用本地的指定端口与远端服务器建立连接,可以调用SocketChannel.bind()方法,不过需要注意的是bind()方法调用必须在open()调用之后,connect调用之前进行,若不明确bind某个端口,在connect时会为此socketChannel随机分配一个端口。
SocketChannel socketChannel = SocketChannel.open();
socketChannel.bind(new InetSocketAddress(LOCAL_PORT));
socketChannel.connect(new InetSocketAddress(InetAddress.getByName(REMOTE_HOST), REMOTE_PORT));
read操作
int read(ByteBuffer dst):方法调用后一次最多可读入的字节数为当前dst中剩余的字节数(即调用dst.remaining()返回的数值),若当前socketChannel是阻塞的,则会阻塞到至少读入一个字节之后返回,若非阻塞,很有可能一个字节都没有读到就返回了,此时返回值为0,如果读到了流的末尾,返回值为-1(什么情况下认为是读到了流的末尾呢?对方关闭socket连接?)。
假设read中传入的buffer dst在调用之前position为p,调用后读入了n个字节,则会填充到dst中从p开始到p+n-1的空间中,填充后dst中position变为p+n。
多线程同时对一个socketChannel发起read操作,只有一个线程可以进行真正的读取操作,其它线程会阻塞直到这个线程读取完成才能进行操作。
long read(ByteBuffer[] dsts):从ByteBuffer数组中第一个buffer开始依次向其中写入数据,第一个buffer写满之后写第二个,以此类推。
read方法实际调用的是IOUtil中read方法,使用DirectBuffer进行数据读取:
public class IOUtil {
    static int read(FileDescriptor fd, ByteBuffer dst, long position,
                    NativeDispatcher nd) throws IOException
    {
        if (dst.isReadOnly())
            throw new IllegalArgumentException("Read-only buffer");
        if (dst instanceof DirectBuffer)
            return readIntoNativeBuffer(fd, dst, position, nd);

        // Substitute a native buffer
        ByteBuffer bb = Util.getTemporaryDirectBuffer(dst.remaining());
        try {
            int n = readIntoNativeBuffer(fd, bb, position, nd);
            bb.flip();
            if (n > 0)
                dst.put(bb);
            return n;
        } finally {
            Util.offerFirstTemporaryDirectBuffer(bb);
        }
    }
}
write操作
int write(ByteBuffer src):方法调用后一次最多可写出的字节数为当前src中从position位置开始的字节数,当SocketChannel工作在阻塞模式下时,write方法会阻塞直到src中从position到limit中所有数据写出才返回;当其工作在非阻塞模式下时,write方法一次调用能写入的字节数取决于当前socketChannel发送缓冲区中可写入的字节数,写出之后立刻返回,若发送缓冲区已满,则write方法返回值为0。
类似于读操作,多线程同时对一个socketChannel发起write操作,只有一个线程可以进行真正的写入操作,其它线程会阻塞直到这个线程写入完成才能进行操作。
write方法实际调用的是IOUtil中write方法,使用DirectBuffer进行数据写入:
public class IOUtil {
    static int write(FileDescriptor fd, ByteBuffer src, long position,
                     NativeDispatcher nd)  throws IOException
    {
        if (src instanceof DirectBuffer)
            return writeFromNativeBuffer(fd, src, position, nd);

        // Substitute a native buffer
        int pos = src.position();
        int lim = src.limit();
        assert (pos <= lim);
        int rem = (pos <= lim ? lim - pos : 0);
        ByteBuffer bb = Util.getTemporaryDirectBuffer(rem);
        try {
            bb.put(src);
            bb.flip();
            // Do not update src until we see how many bytes were written
            src.position(pos);

            int n = writeFromNativeBuffer(fd, bb, position, nd);
            if (n > 0) {
                // now update src
                src.position(pos + n);
            }
            return n;
        } finally {
            Util.offerFirstTemporaryDirectBuffer(bb);
        }
    }
}
close操作
半关闭:分为shutdownInput(),shutdownOutput()两种,关闭的分别是socketChannel的读操作和写操作。连接一端调用shutdownOutput之后,另一端的read操作会返回-1;连接一端调用shutdownInput关闭输入,另一端的写操作没有感知,正常进行。
全关闭:如果当前有线程阻塞在channel上进行IO操作,关闭时阻塞的IO操作会返回。如果当前SocketChannel关闭时仍注册在某个或多个Selector上,关闭时还需要取消这种注册关系。对于建立了连接的A与B,一端在调用了close方法关闭channel之后,另一端的通过SocketChannel进行的read操作会抛出异常:java.io.IOException: Read failed,另一端的写操作没有感知,数据正常写入。
Channel关闭的同时还会调用其保存的所有SelectionKey上的cancel方法,解除与对应的Selector的注册关系。
设置相关选项
SocketChannel setOption(SocketOption
socketChannel.setOption(StandardSocketOptions.SO_SNDBUF, BUF_SIZE);
可以设置的选项种类有:SO_SNDBUF、SO_RCVBUF、SO_KEEPALIVE、SO_REUSEADDR、SO_LINGER、TCP_NODELAY、IP_TOS、SO_OOBINLINE。
各个选项具体意义参见:网络编程相关知识杂记之二(TCP&UDP编程相关)
关联的socket
通过SocketChannel获取的与其关联的Socket对象实际是通过适配器设计模式封装的基于SocketChannel实现的Socket:
class SocketChannelImpl extends SocketChannel implements SelChImpl {

    public Socket socket() {
        synchronized (stateLock) {
            if (socket == null)
                socket = SocketAdaptor.create(this);
            return socket;
        }
    }

    ...
}

//SocketAdaptor中大部分Socket相关功能的实现都是通过SocketChannel来做的
public class SocketAdaptor extends Socket {

    public static Socket create(SocketChannelImpl sc) {
        try {
            return new SocketAdaptor(sc);
        } catch (SocketException e) {
            throw new InternalError("Should not reach here");
        }
    }

    ...
}
可以通过关联的Socket进行流式IO操作,只不过这种IO操作底层还是使用Channel-Buffer模拟实现的,比如:
SocketChannel sc = SocketChannel.open();
···
BufferedReader bufferedReader = new BufferedReader(new InputStreamReader(sc.getInputStream()));
String s = bufferedReader.readLine();
···
通过与Channel关联的Socket进行读写要求Channel必须处于阻塞模式,否则会抛出IllegalBlockingModeException。
与关联的Selector相关的操作
支持在Selector上进行的操作有Connect,Read, Write操作。
ServerSocketChannel
open及bind操作
类似于SocketChannel,ServerSocketChannel创建时也需要使用open方法,创建之后尚未绑定本地端口,在accept方法调用之前需要先调用bind方法显示绑定本地端口,绑定端口的同时可以指定呼入连接请求队列大小:
ServerSocketChannel channel = ServerSocketChannel.open();
channel.bind(new InetSocketAddress(SERVERIP, PORT), 50);
//之后才可以进行accept操作
accept方法
如果ServerSocketChannel处于阻塞模式,accept方法会阻塞直到有新连接到来才返回;若处于非阻塞模式,如果当前呼入连接请求队列中没有连接,则立即返回,不会等待新连接到来。
不管ServerSocketChannel处于阻塞还是非阻塞模式,通过ServerSocketChannel.accept()方法获取的SocketChannel初始情况都是处于阻塞模式的,并且会继承ServerSocketChannel的相关设置(如SO_RCVBUF、SO_REUSEADDR)
设置相关选项
设置方式与SocketChannel相似,具体可以设置的选项有:SO_RCVBUF、SO_REUSEADDR。
获取关联的ServerSocket
获取的实际也是通过适配器模式封装的ServerSocketChannel。
class ServerSocketChannelImpl extends ServerSocketChannel implements SelChImpl {

    public ServerSocket socket() {
        synchronized (stateLock) {
            if (socket == null)
                socket = ServerSocketAdaptor.create(this);
            return socket;
        }
    }

    ...
}
获取关联SelectionKey
支持Selector上监听的操作有Accept操作。
DatagramChannel
open与connect操作
类似于SocketChannel,DatagramChannel创建时也需要使用open方法,创建之后尚未绑定本地端口,在使用DatagramChannel收发数据之前可以使用bind方法绑定本地端口,如不绑定则分配随机端口。
Connect操作意义与DatagramSocket上Connect意义相似,目的是为了限制只能向指定地址收发数据包,并不是与远端建立了一个真正的连接。
read操作及receive操作
int read(ByteBuffer dst):方法必须在DatagramChannel connect方法被调用之后才使用,只接收来自指定远程地址的数据,否则会抛出异常java.nio.channels.NotYetConnectedException。如果处于非阻塞模式,可能什么数据都没读到就返回了,否则会阻塞直到有新的数据包到来。如果新到来的数据包大小大于read方法中传入的buffer的剩余空间大小,则将buffer填满之后,DatagramPacket中剩余的数据会被丢弃。读到流结尾,read方法返回-1。
SocketAddress receive(ByteBuffer dst):相比于read方法,此方法在接收数据之前不要求必须调用过connect方法,带来的后果就是对于每一个接收到的数据报都要对其原地址使用checkAccept方法进行一次权限检查,比read方法多了一些开销。
send操作和write操作
int write(ByteBuffer src):方法必须在DatagramChannel connect方法被调用之后才可使用,只能向指定的远程地址发送数据,发送时如果底层Socket OutputBuffer空间不足,阻塞模式下会等待,非阻塞模式立即返回。返回值为实际写出的字节数,可能为0。
int send(ByteBuffer src, SocketAddress target):相比于write方法多了每次发数据报之前检测目的地址是否合法的开销,返回值为实际写出的字节数。
设置相关选项
设置方式与SocketChannel相似,具体可以设置的选项有SO_SNDBUF、SO_RCVBUF、SO_REUSEADDR、SO_BROADCAST、IP_TOS、IP_MULTICAST_IF、IP_MULTICAST_TTL、IP_MULTICAST_LOOP。
获取关联的Socket
得到的DatagramSocket对象同样是通过适配器设计模式包装的DatagramChannel对象。
与关联的Selector相关的操作
支持Selector上监听的操作有Read、Write操作。
Channel的非阻塞使用
下面的Demo中Server端采用非阻塞模式的accept操作,Client端使用非阻塞模式的read及write操作:
public class ServerChannel {

    private static final String SERVERIP = "localhost";
    private static final int PORT = 8000;

    public static void main(String[] args) throws IOException, InterruptedException {
        ServerSocketChannel serverSocketChannel = ServerSocketChannel.open();
        serverSocketChannel.configureBlocking(false);
        serverSocketChannel.bind(new InetSocketAddress(SERVERIP, PORT));
        while (true) {
            SocketChannel socketChannel = serverSocketChannel.accept();
            if (socketChannel != null)
                new Thread(new SocketChannelThread(socketChannel)).start();
        }
    }

    private static class SocketChannelThread implements Runnable {

        private SocketChannel socketChannel;

        public SocketChannelThread(SocketChannel socketChannel) {
            this.socketChannel = socketChannel;
        }

        @Override
        public void run() {
            if (socketChannel == null) return;
            ByteBuffer src = ByteBuffer.allocate(1024);
            byte[] data = new byte[1024];
            try {
                socketChannel.read(src);
                src.flip();
                src.get(data, 0, src.limit());
                String s = new String(data, 0, src.limit());
                System.out.println("收到数据: " + s);

                if (s.equals("ping")) {
                    src.clear();
                    src.put("pang".getBytes());
                    src.flip();
                    socketChannel.write(src);
                }
            } catch (IOException e) {
                e.printStackTrace();
            } finally {
                try {
                    socketChannel.close();
                } catch (IOException e) {
                    e.printStackTrace();
                }
            }
        }
    }
}

public class ClientChannel {

    private static final String SERVERIP = "localhost";
    private static final int PORT = 8000;

    public static void main(String[] args) throws IOException, InterruptedException {
        SocketChannel socketChannel = SocketChannel.open();
        socketChannel.connect(new InetSocketAddress(InetAddress.getByName(SERVERIP), PORT));
        socketChannel.configureBlocking(false);

        ByteBuffer src = ByteBuffer.allocate(1024);
        byte[] dst = new byte[1024];

        src.put("ping".getBytes());
        src.flip();//写模式切换到读模式

        while (src.position() < src.limit()) {
            socketChannel.write(src);
        }

        int num;
        src.clear();//读模式切换到写模式
        while ((num = socketChannel.read(src)) != -1) {
            if (num > 0) {
                src.flip();
                src.get(dst, 0, src.limit());
                System.out.println("收到回复:" + new String(dst));
            }
        }
    }
}
需要注意的是,Server端虽然此时执行的是非阻塞的accept操作,但是线程模型没有变,仍然是为每一个到来的连接创建一个新的线程,这样使用并不能提升服务器端处理效率,JDK通过Channel引入的非阻塞读写操作意义显然不在于此。自己利用Channel的非阻塞功能实现1:N的线程模型很难实现简单高效,但是当非阻塞的Channel与Java Selector结合使用时,在服务器端就可以使用1:N的线程模型,在某些场景下可以显著提升应用性能,Selector具体使用记录在:Java-NIO编程相关之二(SelectionKey&Selector)
问题:ServerSocketChannel.accept()方法阻塞当前线程等待新连接到来与非阻塞不断轮询是否有新连接到来相比哪个更高效?
参考文章:Java NIO Tutorial
(完)